
In My Studio This Week – Easy Mixed-Media Portrait Anyone Can Create
This week I’m inviting you into my studio for a follow-up from my last post. This time I’m going to show you how to create an easy self-portrait (or any portrait) using only three colors plus white and black.
Self-Portrait Painting Process
Painting a portrait can seem daunting, but with this approach and technique, it is simple for anyone to follow. As an artist who has painted many portraits, I can attest to the fact that there is no single right way to approach portraits and many would-be artists shy away from even trying. The process outlined below is a simple way to create a mixed-media portrait and learn a bit about skin tones and color mixing and can be a steppingstone to feeling comfortable with portrait painting.
1. Gather your materials
A Painting Surface
You’ll need a surface to apply paint, brushes, paint, and a surface for mixing your paints. The surface can be cardboard, mixed media or watercolor paper, a piece of wood or Masonite, or a canvas or canvas board. If using cardboard or a wood product, apply a layer of gesso or even house paint over the surface prior to beginning the next step. I am all about making art approachable so use what you have available. In this example, I used a sheet of mixed-media paper.

Mixing Surface
Again, use what you have. If you don’t have a palette or palette paper, use a disposable plate, a lid from a plastic container, a plastic bag, etc. I like to purchase sheet protectors and insert a piece of white paper inside. Then I have a white surface where I can see the colors more accurately.

Paints
This process is created using acrylic paints. No need to purchase artist’s grade paint. Use what you have or, if needed, buy student grade paints. Make sure they are the heavy bodied variety. The colors you will need are a blue, yellow, red, and white. If your skin tone leans darker, add a black into the mix.

2. Create a Mixed Media Background
If you followed my previous blog posting, you will see where I used leftover paint scraped across mixed media paper using an old room key. If you don’t have any leftover paint, simply apply dots of your favorite paint colors onto a piece of paper – make sure it is heavier than copy paper. Use a palette knife, a room key or credit card, a paintbrush, or even your fingers to spread the paint across the paper. Let it dry before the next step. You can use a hairdryer to dry it faster.

3. Applying Your Photo to the Background
First and foremost, it’s important to choose your photograph carefully. I recommend finding a photo of yourself that only includes you and is taken from the shoulders up. You can crop the photo if needed. Try to find a photograph with cast shadows on the face. I strongly recommend starting with a photograph of yourself although you can use this process for any portrait. Once you have your photograph, make a black and white copy of it on paper that is heavier weight than normal copy paper. I used a light card stock.
Glue the photo onto the mixed-media background using a coat of white glue or a matte medium. Let it dry. A hairdryer can speed up the drying time.

4. Mixing the Paint
Place equal amounts of the red, blue, and yellow, white, and black (if needed) on your mixing surface. Mix some of the red, yellow, and blue together. White and black will be used to lighten or darken the resultant skin tone. You should have a dark brown color. Play with adding white. If the color feels off, try adding a little more of one of the primary colors to see the results. Need a pinker tone? Add some red. Too red? Add a small amount of blue and yellow. The possibilities are nearly endless. One tip is to hold your forearm next to the mixed paints to check for accuracy. You should have a range of colors available on your mixing surface to use for the next step.

4. Start Painting
Begin with the shadows using the darker of your mixed paints using your photo as a guide. Typically the shadows will be found along the jawline, around the eyes, the corners of the mouth and nose, and maybe along the hairline.

Add the midtones. These are usually found under the cheekbones, under the nose, and beside the eyes.
Paint the mouth, I start with a darker reddish hue and add highlights in the center of the lower lip and along the top of the upper lip. Use a dark reddish version of your mixed paints to show the separation of the upper and lower lip. This photo I chose shows me with my mouth slightly open and some teeth showing. Teeth are not bright white. Play with your mix to get a subtle, off-white color. I will say painting the teeth were a bugger for me!
Paint the hair. You can be playful and paint it something wild or try to match your natural color as closely as possible. The hair will not be all one color, so darken or lighten your chosen color to achieve lights and shadows.

Paint the eyes. A point to remember here is that the whites of the eyes are not really white. Try mixing some blue or a touch of black to get a light gray color. Paint your eye color and add some darker shade to outline the iris. The pupil can be painted with the dark brown color mixed initially or add a little black to the blue. Pure black often looks too harsh. After the pupil dries, add a spot of white to bring the eyes to life. Another tip is to add a dot of pink into the inner corners of the eyes.
Add highlights. Typical highlights are found across the brow, along the length of the nose and tip of the nose, and the cheeks.

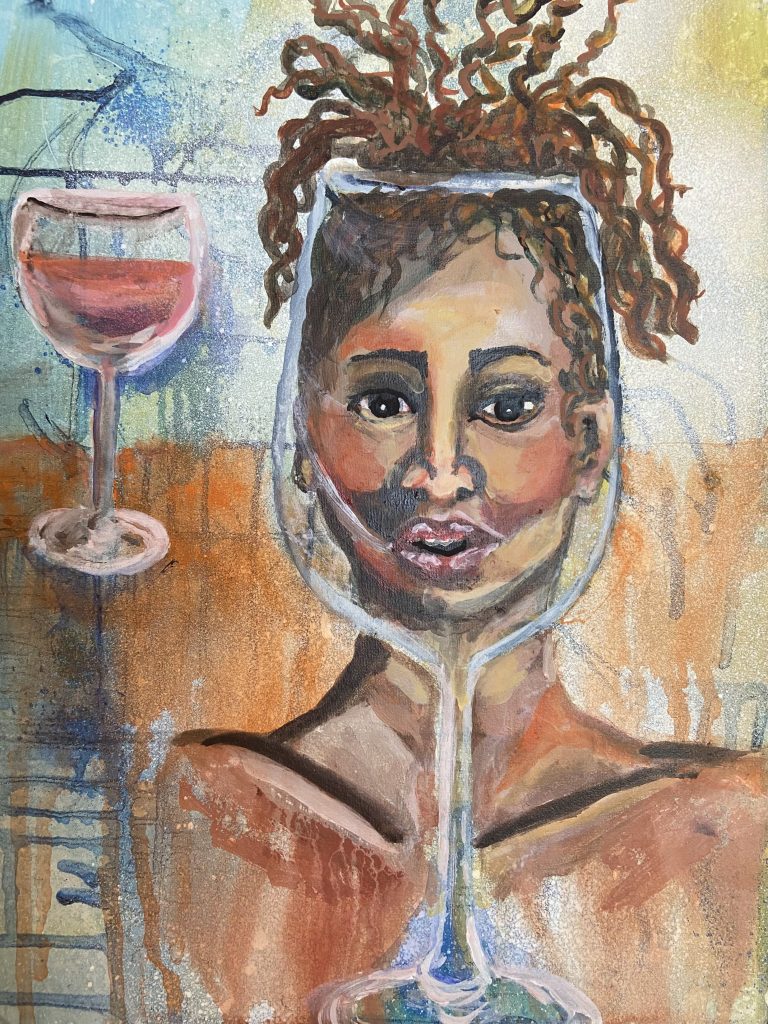
Feel free to embellish your painting with collage, stamps, calligraphy, etc. I felt my background was too dark, so I used some of the hair color to stamp flowers across the background.

What do you think? She’s kind of scary looking. Stay tuned for the next blog post where I will take this process in a different direction. Sign up below for free coloring pages and emails relating creative daily practices you can use to grow and learn.

One Comment